Want to extract data from graph image but don’t have the raw numbers? In this tutorial, you’ll learn exactly how to digitize a graph using GetData Graph Digitizer. With just a few clicks, you can digitize plots manually or automatically and export the results directly into Excel or CSV. Whether you’re a researcher, student, or analyst, this method saves hours of manual effort and delivers clean, accurate data.
Let’s dive into the full workflow—from setup to graph digitization, tilted graph correction, and exporting usable datasets.
Watch the full walkthrough tutorial from here:
Table of Contents
Introduction: Why You Need to Extract Data from Graph Images
In academic papers, reports, or technical PDFs, it’s common to encounter beautifully plotted graphs—without the underlying data. If you’ve ever needed to extract data from a graph image and had no idea where to start, this tutorial will save you hours. Whether you’re trying to digitize a material property curve from a welding paper, or replicate published results for verification, GetData Graph Digitizer is the ideal tool for the job. extract data from graph image
This post will walk you through how to extract data from graph images step-by-step using both manual and automatic methods. You’ll also learn how to handle tilted plots, export your results to Excel, and validate your extracted data visually. extract data from graph image
Extract data from Graph image with Get data Graph Digitizer
Loading and Preparing the Graph Image
To begin, open GetData Graph Digitizer and go to File > Open Image. You can use built-in samples or a custom image saved from a research article. As soon as the image is loaded, apply Fit to Window to bring the full graph into view.
At this stage, the goal is to prepare the workspace so that the software understands your graph axes. This is a critical step when trying to extract data from graph image sources, especially when dealing with nonlinear or logarithmic scales. extract data from graph image
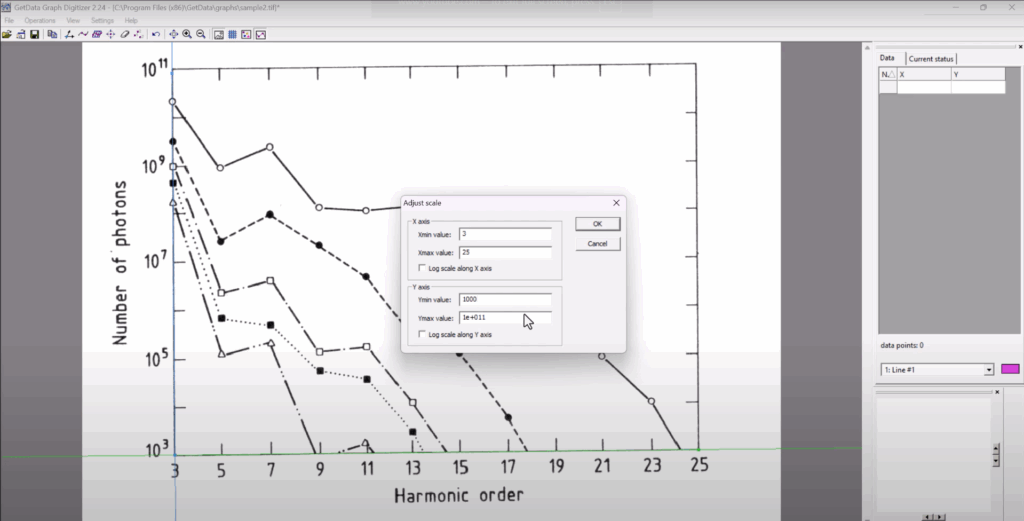
Axis Calibration for Accurate Extraction
Axis calibration is the foundation of data accuracy. Use the crosshair tool to set X-min, X-max, Y-min, and Y-max values based on the tick marks in the image. For example, if your X-axis goes from 0 to 25 and Y from 1e3 to 1e11, you must enter these values precisely. One typo here can lead to inaccurate data when you later extract data from the graph image. extract data from graph image
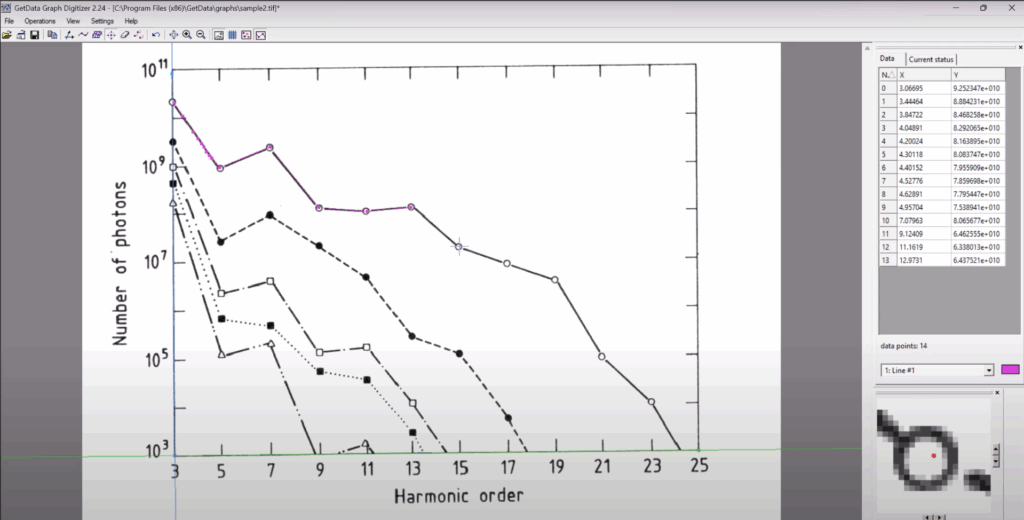
Manual Digitizing for Full Control
In manual mode, activate Point Capture and begin clicking along the curve to define each data point. This method is ideal when the image is cluttered or when you only need a few key values. You can zoom in for precision, assign names to each line, and change colors for better visibility. extract data from graph image
When you want to extract data from a graph image that contains multiple curves, just add new lines for each and repeat the process.
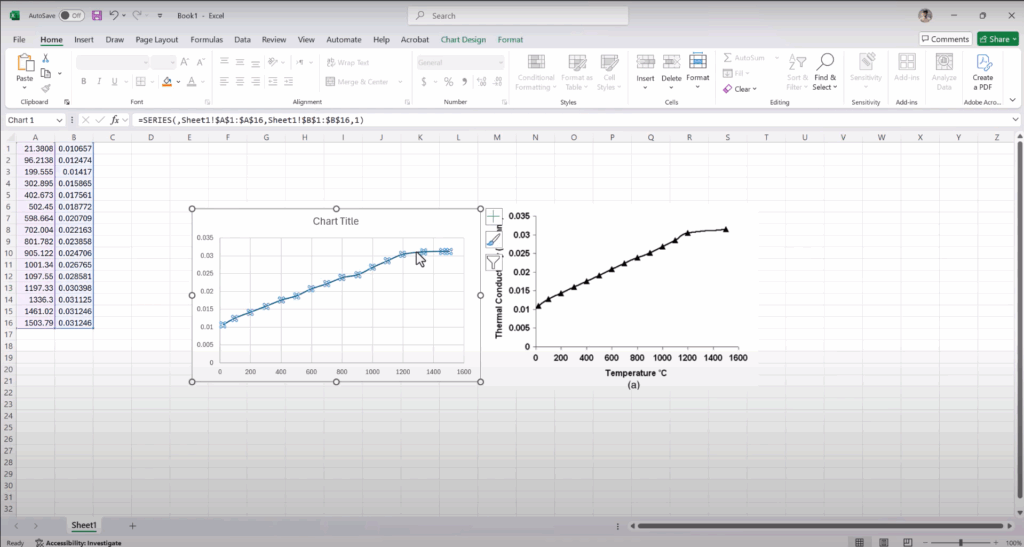
Exporting to Excel or CSV
After capturing points, the data can be exported in two ways:
- Copy and paste into Excel directly using
Ctrl+CandCtrl+V. - Use File > Export Data to save in
.xls,.txt, or.csvformat.
This feature is what makes it practical to extract data from graph image formats and reuse them in simulations, analysis tools, or publications. extract data from graph image extract data from graph image extract data from graph image
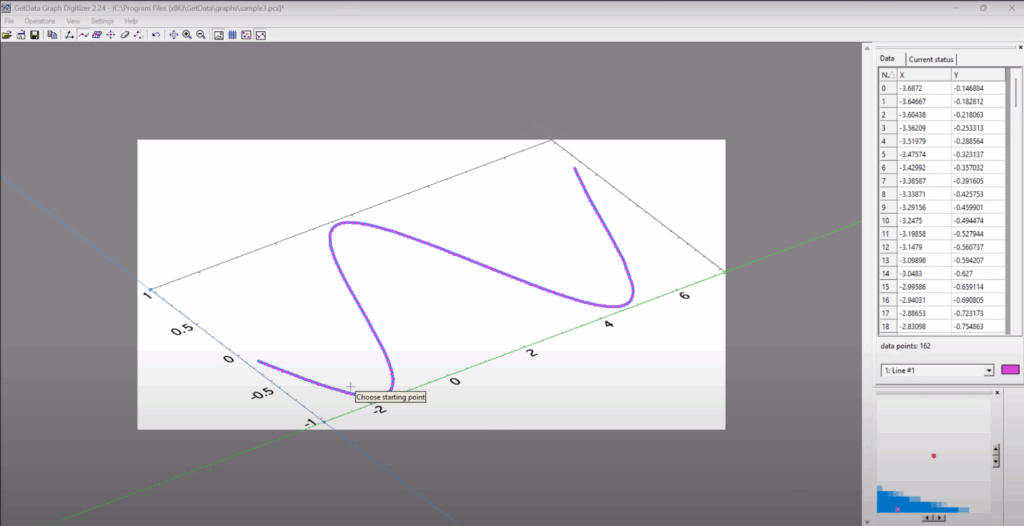
Automatic Digitizing with Auto Trace
If your graph is clean and well-defined, try the Auto Trace tool. This allows you to select a line, and the software will automatically detect and digitize it. While this method works great on sharp curves, it sometimes adds noise or jumps between lines in multi-curve graphs. You can use the eraser tool to clean unwanted points. extract data from graph image
For instance, when you extract data from a graph image with a tilted X-axis, it’s still possible to calibrate and trace it effectively—just double-check the axis angles before saving.
Digitizing Graphs from Research Papers
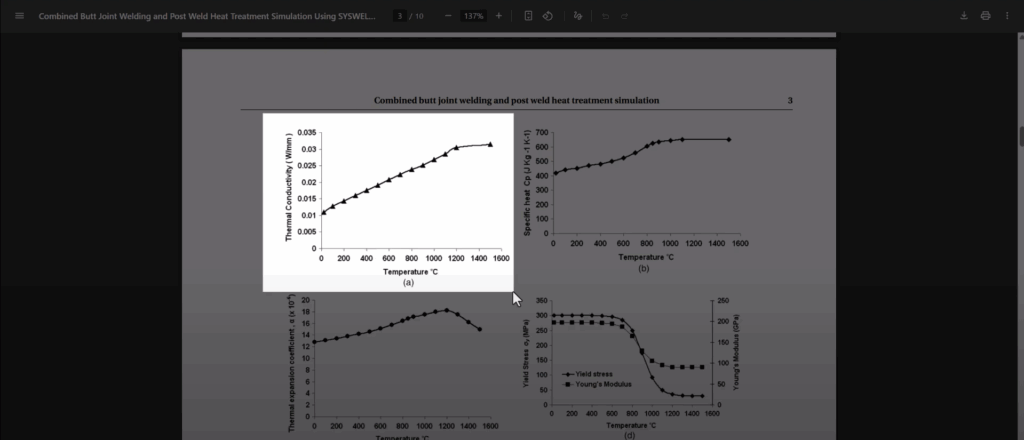
Let’s say you’re working on a welding simulation and find a thermal conductivity vs. temperature curve in a published article. You can snip the graph using Windows’ Snipping Tool, save it as a JPEG, and open it in GetData. Calibrate the axes, trace the line, and extract the data from the graph image in minutes. This kind of reverse engineering is especially useful for defining temperature-dependent material properties in FEA software like Abaqus. extract data from graph image
Verifying and Reordering the Data
After tracing, always double-check your results. Use the built-in sorting tool to order data by X-values, and validate by plotting them in Excel. If the shape matches the original curve (e.g., dips, plateaus, inflection points), you know the extraction is reliable. extract data from graph image
Conclusion: From Image to Insight
Being able to extract data from graph image sources gives you a powerful edge in research and engineering. Whether you’re a student doing lab analysis, a PhD candidate working with legacy data, or an engineer importing curves into Abaqus, this method will save time and improve accuracy. extract data from graph image
If you enjoyed this tutorial, be sure to check out the full video walkthrough on the FEA Master YouTube Channel. Subscribe for more engineering software tips, and stay tuned for the next one. extract data from graph image
If you want to download Abaqus for free check this post.
Download Abaqus For Free
